.png)


Power BI on a Mac? Not So Fast...
If I had a penny for every time a client asked me “Laz, can I download Power BI Desktop on my Mac?”, I’d probably have enough to buy a new car.
And yes, I get it. You can use Excel, Word, Outlook, Teams… but Power BI Desktop? Nope. There’s still no official way to install BI Desktop on your Mac without using some workaround.
The next question is usually: “But surely Power BI for Mac is coming soon… I will be able to run Power BI on my Mac, right?
Well, I’ve been in the Power BI community for years and I remember when this was raised again and again, and every time the impression was a firm no. In fact, here’s an idea that was posted on the Power BI (MS Fabric) Ideas site:

As you can see, despite nearly 4,000 votes and it was declined.
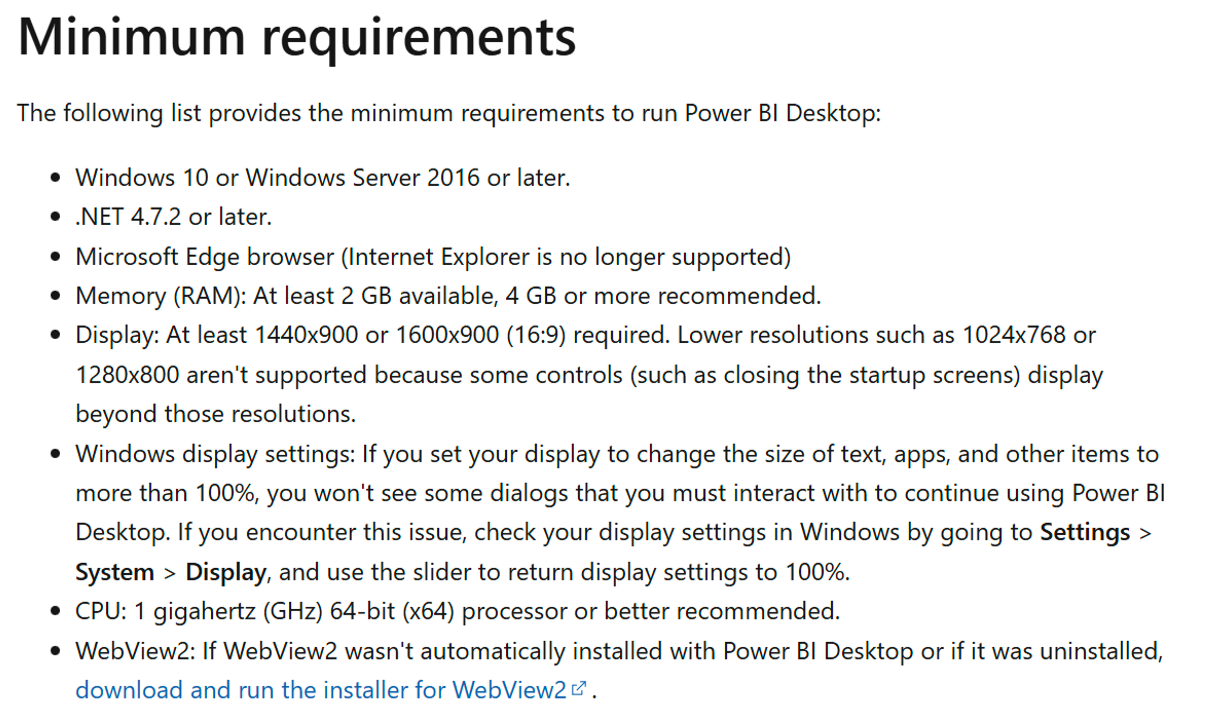
Also, have a look below at the minim requirements for Power BI Desktop. If you want to install Power BI Desktop, you need a windows machine. Mac devices are not supported.
But don’t worry - all hope is not lost! Whether you're developing semantic models, creating high-level reports or deep-dive data analytics, there’s likely a setup that fits your needs.
There are several ways you can use Power BI on Mac, whether you’re a casual viewer or a full-blown report builder. Let’s walk through your options.
Option 1: Power BI Service (Web: app.powerbi.com)
Let me call it out straight away, a few years ago, this was a non-starter. I would not have even considered it for a moment. The Power BI Service was great for viewing and sharing, but you couldn’t do anything close to what Power BI Desktop offered. No modelling, no DAX, no Power Query through the web browser.
But I no longer feel as strongly about it, and that’s because the Power BI team have genuinely stepped up. Bit by bit, they’ve started bringing core Power BI Desktop capabilities into the browser.
Don’t believe me? Take a look at some of these recent milestones:
Edit Data Models in the Power BI Service: Let’s you modify relationships, write DAX measures and manage row-level security straight from the browser. More here.
Create Reports from Excel Files in the Browser: Enables end-to-end report creation by importing and reporting on Excel data entirely in the browser. More here.
Power Query Editing in the Web for Import Models: Introduces query transformations for import mode models all within the Power BI Service. More here.
So… can you use the Power BI Service instead of Desktop for Mac?
Honestly? Yes and no. Here’s why:
Even though Microsoft claims the recent Power Query in the web update is the “final missing piece to unlock a truly complete, end-to-end authoring experience in the browser”… I don’t think that’s quite the case.
For now, you still need an existing Semantic Model in the service before you can edit it. You can’t just open Power BI Service, start from a blank canvas, hit Get Data, connect to a source and go through the full flow of: Ingest, Transform, Model, DAX, Report, Share - all in one clean flow within the browser.
That’s why I said no above, for true end-to-end development, Power BI Desktop is still needed
But… here’s why I also say yes:
I’ve worked with several organisations where Power BI Service was more than enough for MacBook users. Why? Because they weren’t trying to build entire models, they just wanted the ability to build reports.
In those cases, it worked great. The semantic models were already created and published by other users. The Mac users simply connected to them and built reports from the browser without Desktop being needed.
To be clear, I don’t mean to sound too harsh on the Power BI team, as they’ve made serious progress. You can genuinely do far more in Power BI Service now than ever before. Also, while it’s slightly out of scope for this blog, it’s worth noting you can take advantage of other MS Fabric experiences/workloads to truly achieve the end to end solution in the Power BI Service. However, this is not a solution for your average user.
Option 2: Parallels (VM Software)
If you’re a Mac user who wants full Power BI Desktop functionality, this is one of the most popular workarounds available. I know a few people using Parallels Pro Edition, and they’ve been genuinely happy with the overall experience.
I’m calling that out on purpose, because if you read around on forums, you’ll find mixed opinions. Some mention performance issues, but in most cases, that likely comes down to the type of Parallels licence and the resources allocated on your machine.
So, lets start with what is Parallels for using Power BI on Mac?
Parallels is a virtual machine (VM) software that lets you run Windows on your Mac. Think a Windows virtual machine. It creates a fully functional Windows environment inside macOS, allowing you to install and use Power BI Desktop just like you would on a native Windows machine. You can seamlessly switch between your Mac and the Windows based Power BI environment.
There are different editions of Parallels (Standard, Pro and Business), and I would recommend the Pro Edition for Power BI, as it allows you to assign more CPU and RAM to the virtual machine which directly affects performance.
I understand, it’s not a free solution, but for many users, it strikes the perfect balance between flexibility and performance. That said, they do regularly give good discounts. For example, at the point of writing this blog. there is a 35% off discount.
For more information check out this link here: Run Windows Power BI on Mac with Parallels Desktop
Option 3: Azure Virtual Machine (Remote Desktop Access)
At first glance, this might sound similar to Option 2 as they both mention virtual machines, right? But they’re very different approaches.
Parallels is a local VM, running Windows inside your Mac. Everything happens on your machine, using your hardware. Azure on the other hand, gives you a cloud hosted Windows environment. You connect to it through Remote Desktop, meaning nothing runs locally. Your Mac just acts as a window into a full Windows PC in the cloud. So, you’ll use Remote Desktop from your Mac to log into the cloud environment securely.
This is ideal for people who don’t want the overhead of installing Windows on their Mac or want to avoid performance issues tied to hardware limitations. It’s also a good fit for occasional Power BI Desktop users or teams that want to share a common Windows environment.
How do we get started with an Azure Virtual Machine?
- Set up an Azure account
- Go to: https://portal.azure.com
- Create your Windows virtual machine
- Select the required resources (RAM, CPU, Storage)
- Select the base operating system (Image) as Windows 11
- Make sure network settings are all configured correctly
- Ensure the VM allows remote connections
- Install Windows App for Mac (previously Microsoft Remote Desktop App)
- Get latest version Power BI Desktop
To finish up with this option, please make sure to keep an eye on the costs for the Azure VM.
Option 4: Boot Camp
For the last option on how to use Microsoft Power BI on a Mac, you can use Boot Camp. It's a utility built into macOS that allows you to install Windows alongside your macOS system.
Unlike Parallels (option 2), which runs Windows inside your Mac using a virtual machine, Boot Camp allows Windows to run directly on your Mac’s hardware. This means you can run Power BI Desktop without relying on any virtual machine. It does this by creating a separate partition on your disk and giving you the ability to boot into Windows at the start up screen. In other words, when you're in Windows, you're not using macOS at all, you're fully operating in a native Windows environment.
This means performance is great, if configured right with enough resources. There’s no virtualisation overhead and Power BI Desktop runs just as it would on any standard Windows PC. That means smoother performance for heavier analytics tasks. It’s also a good option if you don’t want to purchase additional software like Parallels.
However, there are a few important caveats. From my own research, Boot Camp only works on Intel Macs, so if you have an M1, M2 or M3 chip, Boot Camp is no longer supported. Also, because you’re dual-booting, you have to reboot your Mac each time you want to switch between macOS and Windows, which may not suit everyone’s workflow.
How do we get started with Boot Camp to run Power BI on Mac devices?
- Download the Windows 11 ISO (Link here)
- Launch Boot Camp Assistant
- Partition Your Drive
- Install Windows (select version, license key, partition installation)
- Complete Windows Setup
- Download and install Power BI
- Get Power BI (version of Power BI you need)
For more information check out this link here: Boot Camp Assistant User Guide for Mac – Apple Support (UK)
Summary
If you're a Mac user wondering how to access and use Microsoft’s popular BI tool, I hope this blog gave you the various solutions for running Power BI. While Power BI is primarily built for Windows and there is no sing to be natively available for macOS, we explored several workarounds that are compatible with Mac, such as the Power BI Service through a web browser and other setups such as using virtual machine software like Parallels Desktop.
Whether you're in reporting, dashboarding or just an enthusiast who deep-dives into business analytics, there are several ways to access Power BI even if you're working on a MacBook. The Power BI Service allows report building, sharing and light modelling directly from your browser, while more advanced needs can be met by running the full desktop version inside a Windows environment.
Options like Parallels or Azure give you the ability to run Power BI Desktop within a Windows VM, making it a viable path for Power BI for Mac users who need access to the full toolset. As we said, while not all features are available in Power BI Service (yet), the platform continues to evolve and as a Mac user, you don’t have to miss out. Need more help? We offer Power BI Training!