


.png)


In the first blog of this series I covered what Power BI MCP actually is, the host, client and server vocabulary and the two Power BI MCP servers. I also ended it with a promise, the next one would be hands-on. So here it is, the setup blog and we are starting with the simplest direct setup for the standalone Power BI Modelling MCP Server, its official VS Code extension with GitHub Copilot.
Quick note before we start going through all the details. This blog covers the Modelling MCP Server, the local one for building and changing semantic models. The Remote MCP Server (the hosted one for querying published models) has a different setup path, and for a quick answer on that one, a Microsoft Fabric admin has to enable a tenant setting before anyone in the organisation can use it. That deserves its own blog, so I'm parking it. Also worth a quick mention, Microsoft now ship a broader powerbi-authoring plugin (part of their Skills for Fabric collection) that bundles this MCP server together with a set of Power BI agent skills. That is a wider agentic authoring setup, which I've explained and tested separately, this blog deliberately focuses on installing and using the Modelling MCP Server on its own. And if Claude Desktop is your tool of choice rather than VS Code, hold on, that setup is coming in the next blog. Remember, MCP is the USB C of AI, same server, different clients, so nothing you learn here is wasted.
Let me be upfront about something too. None of this is particularly difficult. The value here isn't the difficulty, it's doing it in the right order, with the right guardrails, so your first session with an AI agent inside your semantic model is a safe and pleasent one.
The quick version, so a skim reader can take it away in one go. The Power BI Modelling MCP Server is a free, local MCP server from Microsoft that lets AI agents create, read and modify Power BI semantic models through natural language. The recommended setup is the Power BI Modeling MCP extension for Visual Studio Code, working with GitHub Copilot as the client. Once running, it connects to models open in Power BI Desktop, published to a Fabric workspace or stored as Power BI Project (PBIP) files. It is in Preview, so expect details to change.
By the end of this blog you will have:
- VS Code, GitHub Copilot and the Power BI Modelling MCP Server installed.
- A live connection to one of your semantic models.
- Your first read prompts and your first (small, deliberate) write.
- The settings and safeguards I'd want in place before letting an agent loose.
A quick refresher on the vocabulary
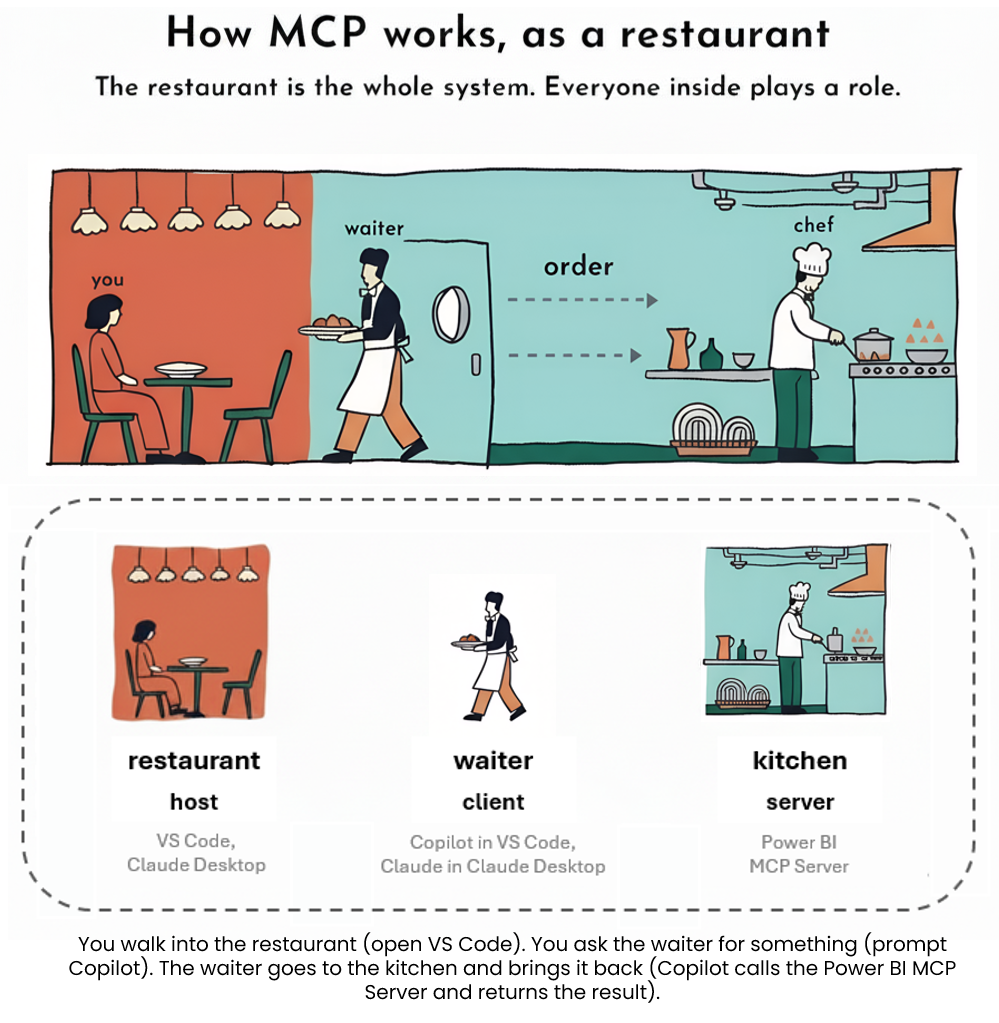
If you read the first blog, you'll remember the restaurant. Three roles worth getting straight, because you'll see them all over Microsoft's docs.
The host is the environment you work in, the restaurant you walk into. The client is the part you actually talk to, the waiter who takes your order. And the server is the part doing the real work out of sight, the kitchen. You only ever speak to the waiter. He carries your order to the kitchen and brings the result back, using a shared language called MCP.
For this blog, that maps cleanly:
- VS Code (or Claude Desktop) is the host, the restaurant you walk into.
- GitHub Copilot (or Claude in Claude Desktop) is the client, the waiter taking your order.
- The Power BI Modelling MCP Server is the server, the kitchen doing the work.
- Your semantic model is the ingredients the kitchen works with.
Keep that in your head as we go, it makes every step below obvious. We are opening a restaurant, in order... build the premises (VS Code), hire the waiter (Copilot), install the kitchen (the MCP Server), then stock the ingredients (connect your model).
Before you install anything, the safety bit
I know, you want to get to the install. But I'm putting this first on purpose, because the order matters. This is an AI agent with write access to your semantic model. Microsoft's own guidance says it plainly, the underlying LLM can produce unexpected or inaccurate results, which could lead to unintended changes, so back your model up before performing operations. I'll go one further: Do not point an AI agent at a model you cannot afford to lose. I am not being dramatic!! In a separate test of Power BI agent skills I watched an agent confidently report a job done, mark its own checks as passed and hand back work that was quietly broken. It took reopening the file in Desktop to find the report would not even load. Confident and wrong, with no idea it was wrong, that is the failure mode to plan for, so always keep a way back.
For your first sessions, use a copy, get comfortable with it, see the results. Take a real model you know well (you'll spot wrong answers faster on familiar ground) and work on a duplicate of it or a sample file. Also remember this is in Preview. Tool behaviour, prompts and settings can and probably will change between now and general availability.
One more thing while we are here. The server (Power BI Modelling MCP Server, the kitchen) acts with your credentials and your permissions, exactly as I explained in the first blog. It does not bypass any Power BI security, but it does mean whatever you can touch, the agent can touch.
Here's the part I see glossed over everywhere. Local does not mean private. The metadata, schemas and query results the server retrieves get passed to GitHub Copilot, and on to whichever model provider sits behind it, OpenAI, Anthropic or Google. Your Power BI permissions control what the agent can reach, not where that data goes once it has it. So before pointing this at anything sensitive in VS Code, check your organisation's AI data handling policies and know which model provider is processing the conversation. As an example, connect to a client PBIP with GitHub Copilot running on GPT and ask the agent to tidy your measures, and those measure names and DAX have left your machine for OpenAI to read before a single change comes back.
If your organisation is starting to think seriously about AI agents near production models, this is a governance conversation, not a tooling one, and it's exactly the kind of question we work through in our Power BI governance engagements. Right, safety briefing done. Let's install!!
What you need before you start
- A Power BI solution to test on: a copy of something real, nothing new to build. Save it as a Power BI Project (PBIP), then open it in Desktop. That's our first connection and the same project covers the PBIP route later on.
- A GitHub account: worth clearing up, because the Copilot we use here is GitHub Copilot, the AI assistant that lives in VS Code, not the Power BI Copilot you may already know. It's free to sign up at github.com and the free tier is enough for a first look, though it picks the AI model for you and caps how much agent usage you get each month.
Step 1: Install VS Code (build the premises: restaurant)
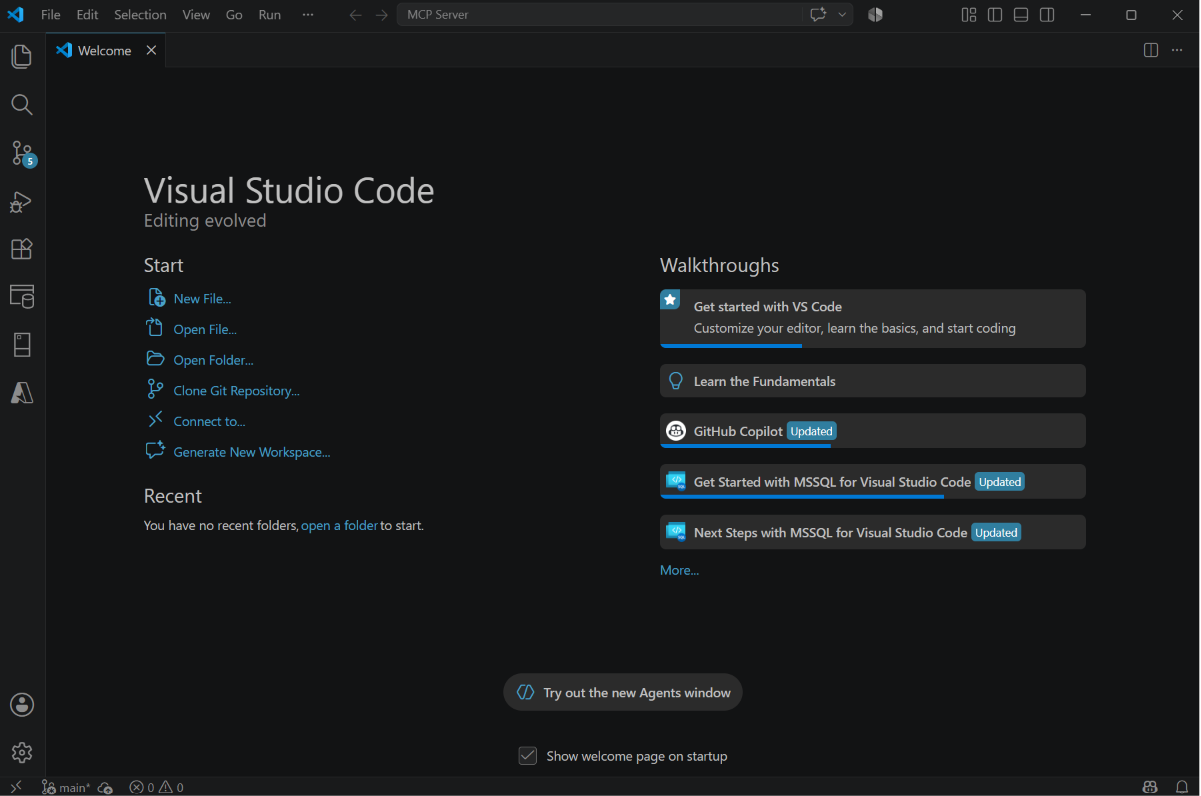
If you already have Visual Studio Code installed, skip ahead. If not, download it, run the installer and accept the defaults. There is nothing Power BI specific about this step, VS Code is simply the host application everything else lives inside. If you've never used VS Code before, do not let that put you off. Think of it as a code editor. For this workflow you will barely touch it beyond a chat panel. You are not about to become a software engineer, you're simply opening a restaurant 😉.
Step 2: Install GitHub Copilot Chat (hire the waiter)
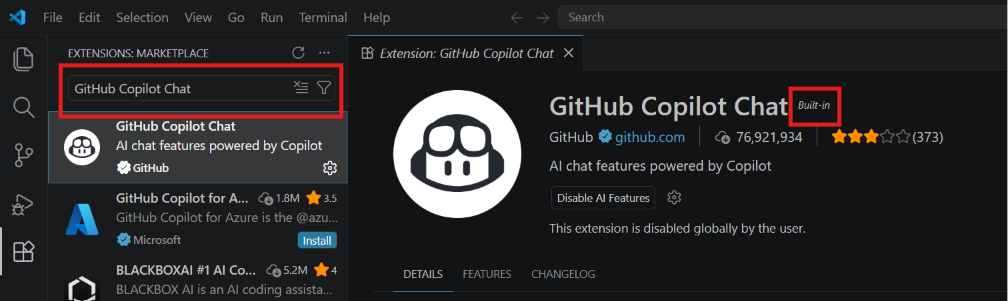
Next, the client. Except you probably don't need to install anything. I went looking for the GitHub Copilot Chat extension to walk you through installing it and found it had "Built-in" badge. I highlighted this in below screenshot. So, it looks like it ships with VS Code now by the looks of it.
That said, have a look anyway for yourself. Go to Extensions view, search GitHub Copilot Chat. Built-in like mine, you're done. Install button, click it and check the publisher says GitHub because there are a lot of lookalikes. Remember, this is the waiter where you will be asking for stuff.
Either way you'll be prompted to sign in with your GitHub account. Quick clarification, this is GitHub Copilot, which lives in VS Code, not the Power BI Copilot you already know. Different product, same name.
Step 3: Install the Power BI Modelling MCP Server (install the kitchen)
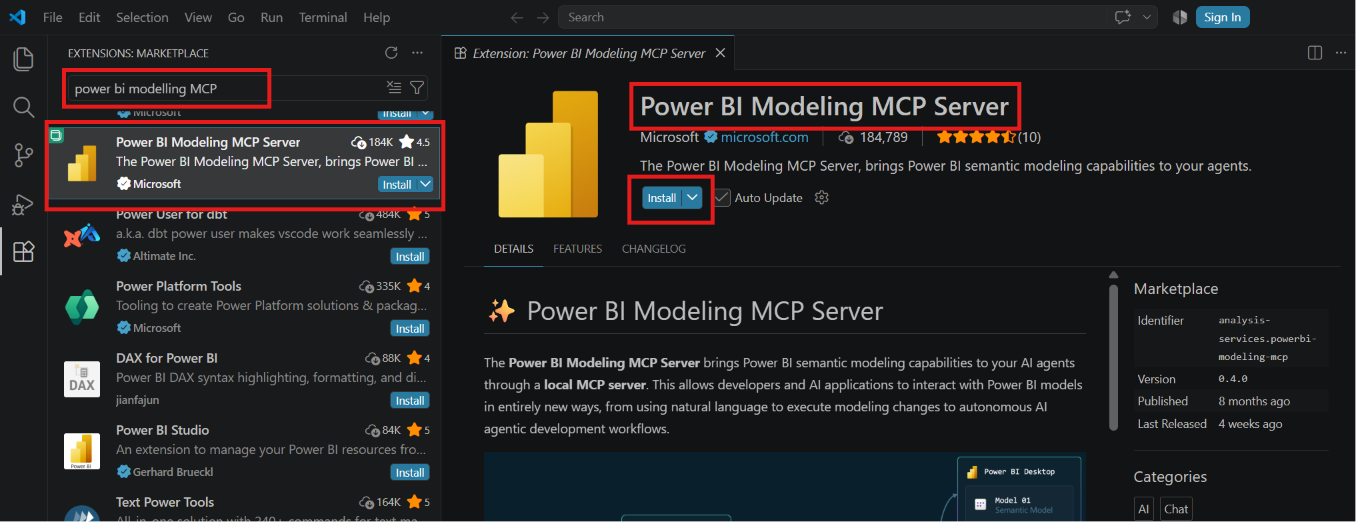
This is the one real install of the three, our kitchen. And it's simple, the server comes as a VS Code extension, so VS Code handles the download, the setup and any future updates for you. Nothing to configure by hand.
In the same Extensions view, search for "Power BI Modeling MCP Server" (published by Microsoft), or go straight to this link here. Check the publisher says Microsoft, there are plenty of other Power BI extensions in the results. Click Install and let it do its thing.
Step 4: Check the server is available (is the kitchen open?)
Open the Copilot chat panel and switch it to Agent mode. This matters, and it catches people out. In the default Ask mode, Copilot will chat about your model but it cannot act, agent mode is what allows it to actually call tools. Generative versus agentic, exactly the shift we talked about in the first blog.
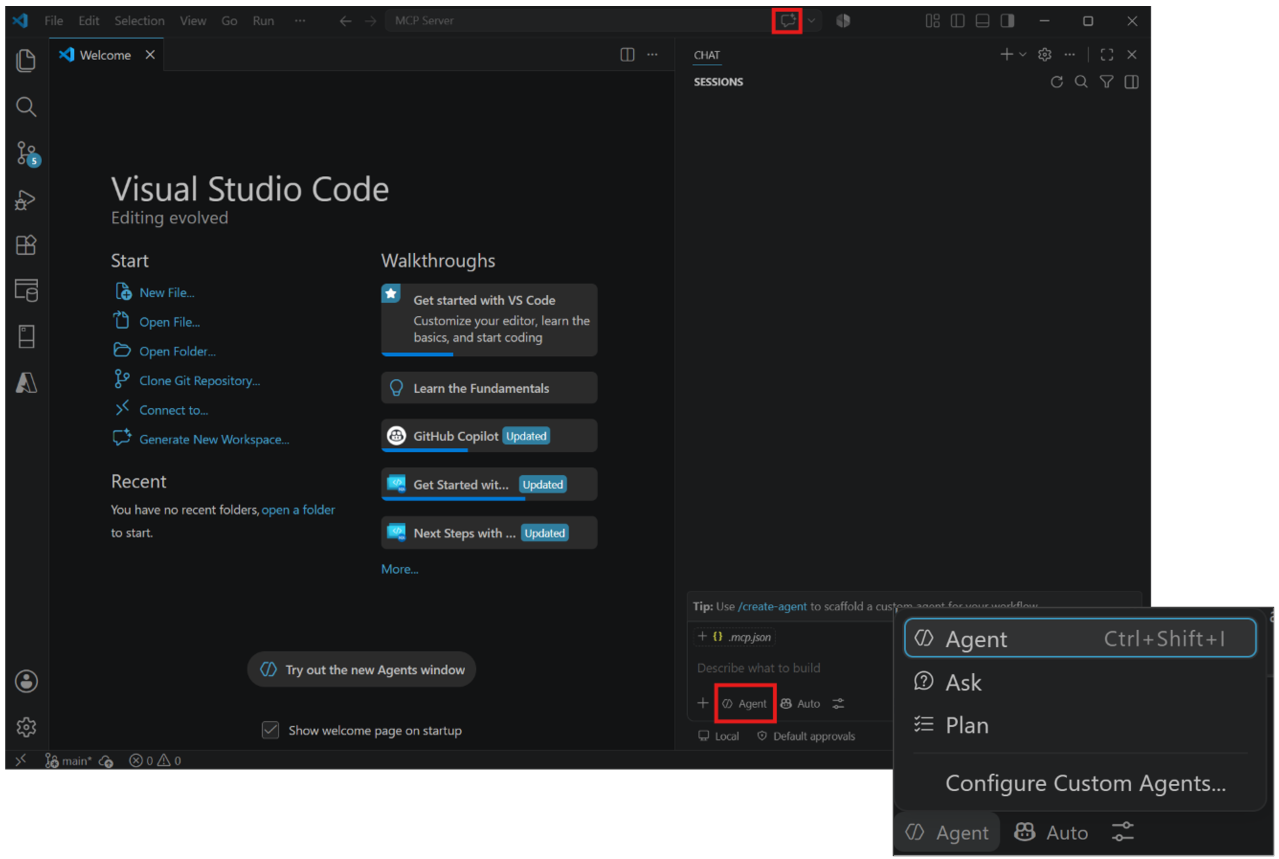
Then click the tools icon in the chat input area. You should see powerbi-modeling-mcp in the list, ticked and ready.

If it is not in the list, do not start reinstalling things just yet. There's a policy called "MCP servers in Copilot", and on company-managed plans (Copilot Business and Enterprise) it is off by default until an administrator switches it on. Microsoft call this out in their own documentation, and I can see it catching plenty of people on corporate accounts. Personal plans (Free and Pro) are not affected. Check that before anything else.
Step 5: Connect to your first model (stock the ingredients)
So the restaurant is ready. You've walked in (VS Code), the waiter is at your table pen in hand (Copilot in Agent mode), the kitchen is lit and warm (the MCP server running). One thing missing, there's no food. A kitchen with nothing to cook is no use to anyone.
That's this step, the install was not the finish line. You now tell the MCP server which semantic model to work with and you do it in plain language, right in the chat.
As covered in the first blog, your model can live in three places, and each has its own connection prompt.
For a model open in Power BI Desktop:
Connect to 'Sales Model' in Power BI DesktopThe file has to actually be open in Desktop for this to work. The server finds the local instance by matching the file name, so use the real name of your PBIX.
For a semantic model published to a Fabric workspace, there are a few prerequisites first and I'm calling them out because this is where I expect most people to get blocked:
- The workspace needs XMLA connectivity: so it has to sit on Fabric capacity, Power BI Premium or Premium Per User. A workspace on shared capacity will not play.
- To modify a published model, the capacity's XMLA endpoint must be set to Read Write: this is a capacity setting, so it may need a conversation with whoever administers yours.
- You need write permissions on the workspace: normally the Contributor, Member or Admin role. Build permission alone generally gets you read access, not model editing rights.
With those in place, the prompt is:
Connect to semantic model 'Sales Model' in Fabric Workspace 'Finance'You'll be asked to sign in with your normal Microsoft account. Your permissions carry over exactly, whatever access you have on that model is what the agent has. No more, no less.
One warning before you modify anything published and this one is important so I will say it plainly. Microsoft flag this directly in their XMLA documentation, a write against a semantic model originally authored in Power BI Desktop can stop that published model from being downloaded as a PBIX afterwards. So keep the original PBIX or PBIP source safely stored before you let the agent change a published model. Between this and the backup advice earlier, you can see the pattern... always keep a way back.
For Power BI Project files on disk:
Open semantic model from PBIP folder 'C:\Repos\SalesModel\Sales.SemanticModel\definition'Point it at the definition folder, the one containing the TMDL files, not the project root. This is the route I tested for the first blog with Desktop fully closed and the agent read the model straight off the disk. Still my favourite party trick of the three.
One note if you have also installed the Power BI agent skills, as I did in a separate blog, you'll see the agent load those skills and run a quick update check before it connects. That's the plugin layer doing its thing on top of the same MCP server, harmless, just a few extra prompts to approve first. On a plain MCP server only setup, the connection is the single step shown above.
There are also built-in prompts to make this even easier. Type / in the Copilot chat and you'll see ready-made commands such as ConnectToPowerBIDesktop, ConnectToFabric and ConnectToPBIP.
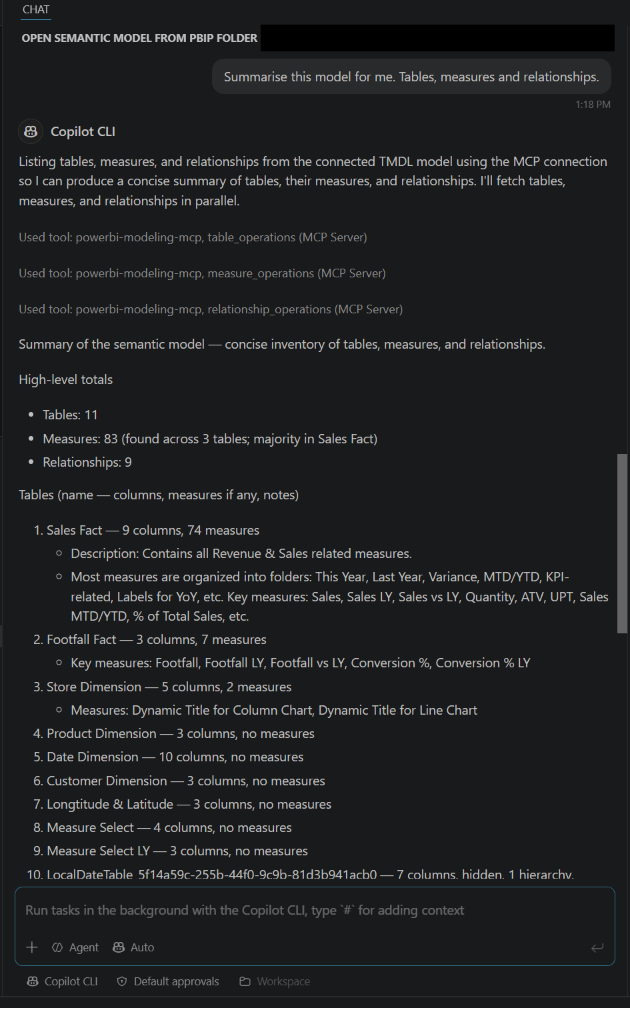
Once connected, ask for proof:
Summarise this model for me. Tables, measures and relationships.If it comes back describing your model accurately, congratulations, you have an AI agent talking to your semantic model! I added a screenshot below:
The confirmation prompt is your seatbelt
Before you run your first change, you should know what to expect. The server asks for your explicit approval before the first modification it makes to a semantic model, and before the first query it executes against one. A small dialog appears, you approve or decline, and only then does it proceed.
There is a setting called --skipconfirmation that switches off the server's approval prompts, so writes go through without asking. It exists for unattended and automated workflows, and we may come back to those later in the series. But while you are learning? Leave it alone (please!). Those prompts are the moment you catch the agent about to do something you did not intend. Microsoft's own advice is to only skip confirmations when you are confident in the operations and have backups and I'd add that confidence should be earned over weeks of use, not assumed on day one.
Your first ten minutes, prompts worth trying
My advice for the first session is simple, and it's the same advice I give clients on most new tooling:
Read first. Write one thing. Verify it. Then scale.
Start with read operations. They cannot change the model, though remember the privacy point from earlier, what they retrieve still travels to the MCP client and on to the LLM provider:
List every measure in this model that has no description.Explain what the measure 'Total Sales YTD' does in plain English.Are there any inactive relationships in this model, and why might they exist?This is also where you get a feel for how well the agent actually understands your model, which depends heavily on the model itself. More on that shortly.
Then make your first write a small one. In the first blog I demonstrated adding a description to a single measure and watching it appear live in Desktop. Do exactly that kind of thing, one object, one property:
Write a clear description to the measure '% of Total Sales' explaining what it calculates.Approve the confirmation, then go and look at the measure in Power BI Desktop yourself. Do not take the agent's word for it, verify with your own eyes.
Once you trust the loop, then you can graduate to the batch operations we talked about last time, descriptions across a whole table, naming convention sweeps, translations. Walk before you run, especially when the thing running is not you.
Summary
So there it is, the Power BI Modelling MCP Server set up end to end in VS Code. We built the restaurant in order... VS Code as the host, GitHub Copilot as the client, the Modelling MCP Server installed as an extension, then a model connected from Desktop, a Fabric workspace or PBIP files. And we ran the first prompts the sensible way, reads before writes, one small change before any batch work, confirmations left firmly on.
None of it is hard, and that is partly the point. The barrier to putting an AI agent inside a semantic model is now roughly zero, which is exciting and slightly terrifying in equal measure. The discipline has to come from you, backups, copies, read-only first, verify everything. Keep it Preview-shaped in your head, experiment freely, depend on nothing yet.
This blog sits alongside the first blog in the series, which covers what MCP is and the two Power BI MCP servers, so if you landed here first, that one gives you the foundations. In the next blog we do this all over again for Claude Desktop, same kitchen, different waiter, and the setup looks quite different because there's no extension marketplace to lean on. After that, the one I'm most looking forward to writing... real-world testing, where it holds up and where it falls short. Keep an eye out.


.png)
.png)